• 主页
  • 系列总集
  • OpenCV
  • CMake
  • iOS
  • Java
  • 前端
所有文章 关于我

  • 主页
  • 系列总集
  • OpenCV
  • CMake
  • iOS
  • Java
  • 前端

CAAnimation(八) MaskView和SubLayer组合动画

2017-04-08

MaskView的原理

在UIView中有一个属性叫Mask

1
open var mask: UIView?

可以通过另外一个UIView的Alpha通道和当前的UIView进行与运算,对当前的UIView进行显示,例如

1
2
3
4
5
let view: UIView = UIView(frame: CGRect(x: 0, y: 0, width: 300, height: 100))
let mask: UIView = UIView(frame: CGRect(x: 50, y: 0, width: 100, height: 100))
view.backgroundColor = UIColor.red // 背景色为300*100的红色
mask.backgroundColor = UIColor.blue // 仅仅是为mask提供了Alpha通道,所以设置成任何颜色都可以
view.mask = mask // 得到一个 100*100 的红色

得到结果

image01

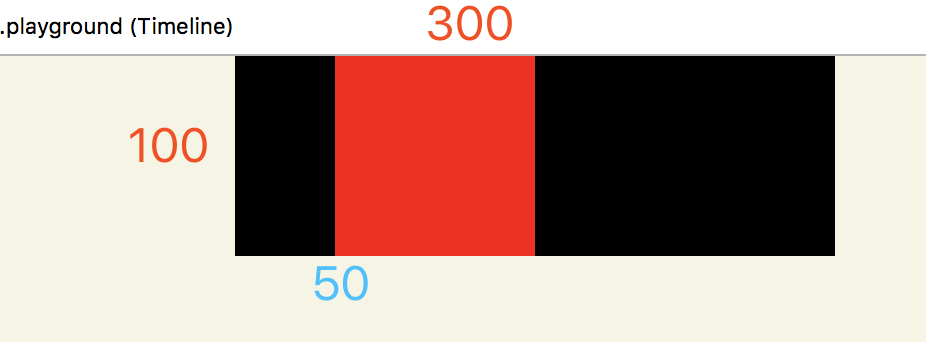
可以看到我们把 view设置成了红色,但是只显示了50px之后maskView的部分 , 是因为除了maskView之外的像素点,在MaskView的图层Alpha通道都为0

组合SubLayer

如果我们直接更改MaskView的Frame的话,感觉View的可见尺寸 (红色部分) 变化会比较突然,没有任何平滑效果,根据Mask的原理

可以用SubLayer控制Alpha通道从而得到隐式动画效果

1
2
3
4
5
6
7
8
9
10
11
12
let view: UIView = UIView(frame: CGRect(x: 0, y: 0, width: 300, height: 100))
view.backgroundColor = UIColor.red

//Sublayer Refract
let maskLayer:CALayer = CALayer()
maskLayer.backgroundColor = UIColor.blue.cgColor
maskLayer.frame = CGRect(x: 50, y: 0, width: 100, height: 100) <===使用maskLayer来控制大小

//Use Sublayer Control Alpha
let mask: UIView = UIView(frame: view.bounds) <====注意这里mask恢复到了和view一样大小
mask.layer.addSublayer(maskLayer)
view.mask = mask

此时只要更改 maskLayer 的Frame就可以获得带有动画效果Frame变化

一个音量变化的示例

如果想做麦克风音量变化、WiFi信号强度的变化的动画,可以使用这种方式,下面是一个麦克风音量变化的Demo

1
2
3
4
5
6
7
8
9
10
11
12
13
14
15
16
17
18
19
20
21
22
23
24
25
26
27
28
29
30
31
32
33
34
35
36
37
38
39
40
41
42
43
44
45
46
47
48
49
50
51
52
53
54
55
56
57
58
59
60
61
62
63
64
65
66
67
public class SoundVolumeView : UIView {


//-----------------------------------
// MARK: Logic
//-----------------------------------
public var percent: CGFloat = 1 {
didSet {
percent = percent > 1 ? 1:(percent < 0 ? 0 : percent)
let width = on.bounds.size.width * percent
blockLayer.frame = CGRect(x: 0, y: 0, width: width, height: on.bounds.size.height)
}
}

//-----------------------------------
// MARK: Private
//-----------------------------------
private let blockLayer: CALayer = CALayer()
private let off: UIImageView = UIImageView(image: UIImage.init(framework: "uisit_sound_volume_off"))
private let on: UIImageView = UIImageView(image: UIImage.init(framework: "uisit_sound_volume_on"))
private let blockView: UIView = UIView()

//-----------------------------------
// MARK: Override
//-----------------------------------
override public init(frame: CGRect) {
super.init(frame: frame)
setupSound()
constraintFrame()
patternSound()
}

required public init?(coder aDecoder: NSCoder) {
super.init(coder: aDecoder)
}

//-----------------------------------
// MARK: Keep Frame
//-----------------------------------
override public func layoutSubviews() {
super.layoutSubviews()
if !self.bounds.equalTo(blockView.bounds) {
constraintFrame()
}
}

func setupSound() {
self.addSubview(off)
self.addSubview(on)
}


func constraintFrame() {
off.frame = self.bounds
on.frame = self.bounds
blockView.frame = self.bounds
blockLayer.frame = self.bounds
}

func patternSound() {
blockLayer.backgroundColor = UIColor.white.cgColor
blockView.layer.addSublayer(blockLayer)
on.mask = blockView
}

}

赏

请问老板还招人么(/ω\)

支付宝
微信
  • iOS
  • CoreAnimation
  • Tutorial

扫一扫,分享到微信

微信分享二维码
UIImage如何转换成CALayer
CAAnimation(七) 利用CATransaction完成动画平滑过度
© 2021 Alan Li
Hexo Theme Yilia by Litten
  • 所有文章
  • 关于我

tag:

  • iOS
  • Java
  • Collection
  • Python
  • Shell
  • CMake
  • Memory
  • JavaScript
  • Architecture
  • AnchorPoint
  • Android
  • Web
  • Annotation
  • AFNetworking
  • Window
  • ViewController
  • AutoLayout
  • Dozer
  • CoreAnimation
  • Cycle Retain
  • Block
  • UI
  • IDE
  • FrontEnd
  • CSS
  • Category
  • TableViewCell
  • Security
  • Net
  • JSP
  • Spring
  • C
  • MyBatis
  • Date
  • React
  • GCD
  • UITouch
  • Gesture
  • UIControl
  • Git
  • HTML
  • HTTPS
  • HTTP
  • Servlet
  • Server
  • DataBase
  • MySQL
  • Linux
  • Tutorial
  • Ajax
  • Type
  • JQuery
  • JSON
  • Exception
  • Parameter
  • Reflect
  • Thread
  • Sort
  • KVO
  • MKMapKit
  • Overlay
  • Maven
  • Configure
  • Tips
  • Transaction
  • Swift
  • NavigationBar
  • Nginx
  • Runtime
  • OpenCV
  • Property
  • Playground
  • Protocol
  • Redux
  • ScrollView
  • Session
  • Cookie
  • Shiro
  • Error
  • Singleton
  • RegEx
  • StackView
  • StatusBar
  • Base64
  • Socket
  • TCP
  • IP
  • TextField
  • CALayer
  • UILabel
  • View
  • Animation
  • Xcode
  • Hexo
  • Terminal
  • OC
  • Device
  • Log
  • Image
  • JUnit
  • Oval
  • Archive
  • XSS
  • Compiler
  • Aspect
  • Responder
  • Class
  • FireWall
  • RetainCount
  • Const
  • Frame
  • String
  • Symbols
  • Framework
  • CocoaPods
  • Unity
  • Message
  • Button
  • AuthorizationStatus
  • Struct
  • XCTest
  • NSNotification
  • Contact

    缺失模块。
    1、请确保node版本大于6.2
    2、在博客根目录(注意不是yilia根目录)执行以下命令:
    npm i hexo-generator-json-content --save

    3、在根目录_config.yml里添加配置:

      jsonContent:
        meta: false
        pages: false
        posts:
          title: true
          date: true
          path: true
          text: false
          raw: false
          content: false
          slug: false
          updated: false
          comments: false
          link: false
          permalink: false
          excerpt: false
          categories: false
          tags: true
    

我写的,大概率是错的。。。。。