
需求是什么
我们公司用了一个坑坑的密码控件TextFiled,此时需要一个6位的支付密码框,由于密码控件是封装起来的,我们改变不了,于是我们决定使用折中方案
- 自定义一个UIView,SubView包括一个TextFiled和一个UIView,把UIView盖在TextField上,并且自己在UIView上画出来密码控件
多么机智的刘岩姐
提出这个方案的是刘岩姐,于是便有了利用Core Graghics绘图的过程,绘图是通过重写自定义View的**drawRect:**方法
static const CGFloat cornerRadius = 8.0;

@interface PayPGTextFieldView () <OnCharDelegate, PGTextFieldDelegate>
@property (nonatomic, weak) UIView *contentView;
@property (nonatomic, strong) NSMutableArray *pointArray;
@end


#pragma mark - Draw
// Only override drawRect: if you perform custom drawing.
// An empty implementation adversely affects performance during animation.
- (void)drawRect:(CGRect)rect {
    [super drawRect:rect];
    // Drawing code
    CGFloat width = rect.size.width;
    CGFloat height = rect.size.height;
    //计算图标
    CGFloat singleWidth = width/_textField.m_iMaxLen;
    CGFloat everyWidth = singleWidth / 3;
    CGFloat everyHeight = everyWidth;
    //通过画布绘图
    CGContextRef context = UIGraphicsGetCurrentContext();//获取当前画布
    CGContextSetStrokeColorWithColor(context, LINE_COLOR.CGColor);//设定Stroke的颜色
    CGContextSetLineWidth(context, 0.5);//设置划线的宽度
    for(int idx = 1; idx < _textField.m_iMaxLen; idx++)
    {
        CGPoint sourcePoint = CGPointMake(singleWidth * idx, 0);
        CGPoint targetPoint = CGPointMake(singleWidth * idx, height);
        CGContextMoveToPoint(context, sourcePoint.x, sourcePoint.y);//画笔移动到起始点
        CGContextAddLineToPoint(context, targetPoint.x, targetPoint.y);//画笔画到结束点
    }
    CGContextStrokePath(context);//把画笔画过的地方着色(Stroke)
    //根据重绘的画布设置小圆点的Frame
    for (int i = 0; i < 6; ++i) {
        UIView *view = _pointArray[i];
        [view setFrame:CGRectMake(i *singleWidth  + everyWidth, (height - everyHeight) / 2, everyWidth,  everyHeight)];
        view.layer.cornerRadius = everyWidth / 2;
        view.hidden = YES;
    }
}
画方形等应该怎么画
//Get the CGContext from this view
CGContextRef context = UIGraphicsGetCurrentContext();
//Draw a rectangle
CGContextSetFillColorWithColor(context, [UIColor redColor].CGColor);
//Define a rectangle
CGContextAddRect(context, CGRectMake(10.0, 150.0, 60.0, 120.0));     //X, Y, Width, Height
//Draw it
CGContextFillPath(context);
Core Graphics和动画的层次关系
我们先来盗一张图
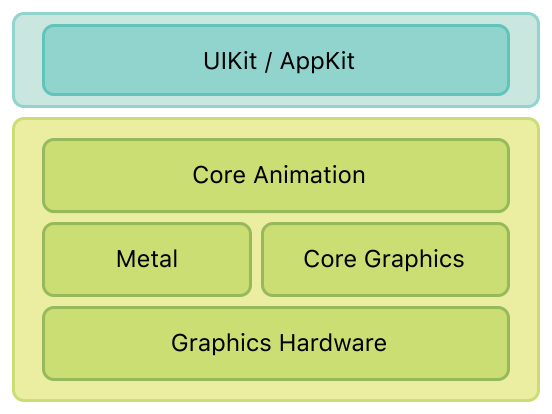
这张图是苹果官方文档给出的动画机制的层次结构,可见Core Graphics是在动画层之下,和OpenGL同层,听上去吊吊哒.
所以说Core Graphics里的绘图是是画布层面上,直接操作的像素点.会比动画更早响应,这是是为什么如果重写drawRect:之后不设置背景色,除了被Stroke的部分都是黑色,因为没有像素(0,0,0)嘛.
动画机制原理
根据参考文档描述,动画和视图的渲染有一个单独的进程,在iOS5以前这个进程叫SpringBoard,在iOS6之后叫BackBoard。我们以下统一称为render server.
在App内部的阶段
- 布局:在这个阶段,程序设置 View / Layer 的层级信息,设置 layer 的属性,如 frame,background color 等等。
- 创建 backing image:在这个阶段程序会创建 layer 的 backing image,无论是通过 setContents 将一个 image 传給 layer,还是通过 [drawRect:] 或 [drawLayer: inContext:] 来画出来的。所以 [drawRect:] 等函数是在这个阶段被调用的。
- 准备:在这个阶段,Core Animation 框架准备要渲染的 layer 的各种属性数据,以及要做的动画的参数,准备传递給 render server。同时在这个阶段也会解压要渲染的 image。(除了用 imageNamed:方法从 bundle 加载的 image 会立刻解压之外,其他的比如直接从硬盘读入,或者从网络上下载的 image 不会立刻解压,只有在真正要渲染的时候才会解压)。
- 提交:在这个阶段,Core Animation 打包 layer 的信息以及需要做的动画的参数,通过 IPC(inter-Process Communication)传递給 render server。
在App外部iOS系统层阶段
- 根据 layer 的各种属性(如果是动画的,会计算动画 layer 的属性的中间值
- 用 OpenGL 准备渲染。渲染这些可视的 layer 到屏幕。
iOS设备的屏幕刷新频率是是60HZ。如果上面的这些步骤在一个刷新周期之内无法做完(1/60s),就会造成掉帧。
参考文档优化动画效果的结论
- 减少隐藏的绘制:CATextLayer和UILabel都是将text画入backing image的。如果改了一个包含 text的view的frame的话,text会被重新绘制。
- 使用Rasterize:当有比较复杂的Layer层(Table中Cell的圆角)效果,可以使用Layer的shouldRasterize=YES(记得设置适当的rasterizationScale),Layer会被先绘制成bitmap放进内存缓存起来,读取加载会比较顺滑。这种方法适用于不经常改的Layer,如果Layer经常变,就不适合用。
- 避免离屏绘制:实现Rounded Corner/Layer Masks/Drop Shadows的效果可以使用 Stretchable Images。比如实现圆角可以让设计给切较小的圆形的图片,Strectch后用于BackgroundImage或者Layer的Content的属性,记得设置好ContentsCenter和ContentScale。
- 减少Blending&Overdraw:如果一个Layer被另一个Layer完全遮盖,GPU会不渲染被遮盖的Layer,但是计算是否遮盖很消耗性能,可以通过setBackgroundColor:不透明的颜色或setOpaque:YES手动告诉GPU不要去计算遮盖
- 避免将几个半透明的Layer的Color融合在一起,理由也是同4。
名词解释
Rasterize
在苹果的2012年WWDC大会上,引入的一个CALayer内的BOOL属性,来控制是把Layer在一个离屏绘制的Context上计算好生成bitmap再提交,还是实时运算,默认是NO.
如果你有一堆复杂动画的Layer,但是这些Layer自己并不改变,应该设置成YES,如果Layer经常改变,应该设为NO,此时如果设为YES反而会变慢
离屏绘制
离屏的绘制一般两种情况:
- 有些效果(如 rounded corners,layer masks,drop shadows 和 layer rasterization)不能直接的绘制到屏幕上,必须先绘制到一个 image context 上,这种操作会引入额外的内存和 CPU 消耗。
- 实现了 drawRect 或者 drawLayer:inContext:,为了支持任意的绘制,core graphic 会创建一个大小跟要画的 view 一样的 backing image。并且当画完的以后要传输到 render server 上渲染。所以没事不要重载 drawRect 等函数却什么都不做。
参考文献
[1]http://bugly.qq.com/bbs/forum.php?mod=viewthread&tid=297
[2]http://stackoverflow.com/questions/19405741/when-should-i-set-layer-shouldrasterize-to-yes